
Counterwallet has a nice feature which lets you keep your private key on an offline computer running Armory, while being able to initiate transactions from Counterwallet, transfer them to your offline system for signing, and back to Counterwallet for broadcast to the network. This, essentially, allows you to keep your SJCX in an Armory cold storage, while being able to see and control your funds from Counterwallet. Here's a tutorial on how to do this.
About cold storage transactions
A transaction with BTC (and therefore also with SJCX, since SJCX uses the Counterparty protocol, which in turn uses Bitcoin) can be roughly broken into three main steps: Creating the transaction, signing the transaction, and broadcasting the transaction to the Bitcoin network.
When you use a hot wallet, these three steps are usually performed automatically for you, all in one go. With cold storage, you keep your private key on a computer that has never been and never will be connected to the Internet. The reason for this is to hugely reduce the risk of someone cracking your computer and getting access to your private key, and thereby your wallet.
This separation means that the three steps will have to be performed as three actual steps. First, the transaction must be initiated/created on the online computer, then moved via a USB drive or similar to the offline computer for signing by your private key, then moved back to the online computer for broadcasting to the Bitcoin network.
Prerequisites
- A computer that has never been connected to the Internet since before the operating system was installed, and never will.
- Armory installed on your offline computer. We will not cover this here, as it is out of scope for this tutorial. Also, the installation procedure will vary from system to system (personally I would recommend running a cold storage on Ubuntu Linux, or maybe even gNewSense for the super paranoid). The first part of this video tutorial shows hot to install Armory as a cold storage on Ubuntu. Unlike when using Armory online, for this you don't need to have bitcoind installed, and you don't need to download the entire blockchain to your offline computer. We will cover setting up Armory, though, just not installing it.
- Armory installed and running with an updated copy of the blockchain on a computer that is connected to the Internet (an online computer). We will need this for just one transaction during setup; after that you may remove this online Armory installation and the blockchain if you need the space.
- A Counterwallet where you have the SJCX that you want to keep in cold storage.
Setting up
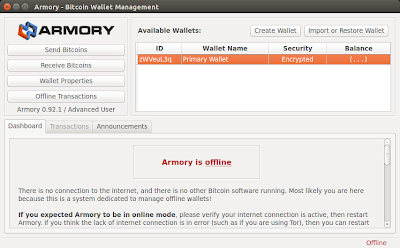
- Run the offline version of Armory on your cold storage computer. On my system, the icon for this is called "Armory (Offline)".
- If you haven't already, set up a new wallet with a strong password. During creation of the wallet, you will be asked to make a backup, and you should definitely do this! Good practice is to make at least two paper backups and keep them at separate, secure locations (like one in your safety box, and one in your bank, etc.)
- Select your newly created wallet and click the "Receive Bitcoins" button. This will create a new address for you. This is the address that will be your cold storage.
- From Counterwallet, transfer your SJCX funds to the address you just got from offline Armory. You should probably start out with a small amount, or some SJCT (Storj test coin which you can get for free from the Storj forums), until you feel safe.
- From any Bitcoin wallet, transfer a small amount of BTC. This will cover the fees for when you want to transfer SJCX away from the cold storage at a later time, plus you will need a small amount of BTC to later make one transaction from the cold storage address before you can properly add it to Counterwallet.
- In offline Armory on your cold storage computer, select your wallet and click the "Wallet Properties" button. Then click the "Export Watching-Only Copy". Save your watching-only copy of the cold storage wallet on a USB drive, or write down the root data information that appears.
- In online Armory, select the "Import or Restore Wallet" button. Load the file from the USB drive, or type in the root information and click "Restore Wallet". Go make a cup of coffee while Armory computes new addresses and rescans the blockchain.
- Now you need to send a small amount of BTC from the cold storage address to somewhere else. This is because this will expose the public key of the address, and Counterwallet needs that to act as a "front-end" to your cold storage. Since the address is in cold storage, we will need to create the transaction "cold storage style", which is described here:
- In your online Armory, select the watching-only copy of your offline-wallet, then click "Send Bitcoins".
- Make sure you select "Use an existing address for change", and then "Send change to first input address". Then type in the address to where you want to send (probably to where it came from), and a small BTC amount. In Armory, you choose the fee amount yourself, but Armory will complain if it is too low for your transaction. Try with 0.00001 BTC first, and if it doesn't work, try with 0.0001 BTC. Then click "Continue".
- From the appearing window, save the transaction data to a USB drive.
- In offline Armory on your cold storage computer, click the "Offline Transactions" button, then "Sign Offline Transaction". Load the transaction file from your USB drive and click "Sign". Now a signed transaction file will be saved to your USB drive.
- Put your USB drive back in your online computer, and click "Continue" in the window you left open (if you closed it, you can get back via the "Offline Transactions" button). Load the signed transaction file from your USB drive and click "Broadcast".
- Now you can add the cold storage address in Counterwallet: Click "Create New Address", and then "Create Armory Offline Address". Type the address you got from Armory in the "Address" field, and some descriptive text in the other field, such as "Cold storage". Click "Create New Address".
Sending funds TO the cold storage
You should now be able to see the funds in your cold storage from Counterwallet. Adding more funds to it is easy: Just transfer SJCX or BTC (or any other Counterparty asset, for that matter) to the address that Armory gave you.
Sending funds FROM the cold storage
The whole point of a cold storage is to keep your funds secure. While sending funds TO the cold storage is easy as pie, this extra layer of security means that sending funds FROM the cold storage is slightly more cumbersome. Luckily, a cold storage is not meant for everyday use, but it is extremely secure for storing larger amounts that you don't need to access very often.
During the setup, you actually already created, signed, and broadcast a BTC transaction from your cold storage through Armory alone. The process is very much the same for SJCX, except now you will create and broadcast the transaction from Counterwallet. You will still be signing the transaction from offline Armory.
- In Counterwallet, you create an offline transaction in the same way you would initiate a normal transaction: Find your offline address in the list. Open the dropdown next to SJCX (or what ever asset you want to send) and click "Send". Paste the address you want to send to, and enter an amount. Click "Send".
- Now, instead of signing and broadcasting the transaction (Counterwallet can't sign because it doesn't have your private key), Counterwallet will present you with a text representation of the transaction. Copy the entire text (including all the equality signs) to a new txt file on your USB drive.
- In your offline Armory, click the "Offline Transactions" button, then "Sign Offline Transaction". Open the txt file from the USB drive in a text editor, and copy the entire text to the clipboard. Insert it in the text field that appeared in Armory, and click "Sign".
- Now the text in Armory's text field changed, and the transaction has been signed. Copy the changed text back to the text file on the USB drive (make sure to remove all of the old text first).
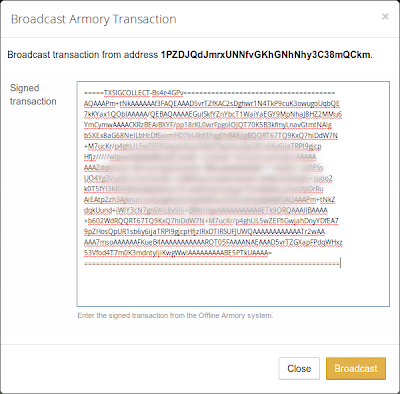
- Back in Counterwallet, click the "Address Actions" dropdown next to your cold storage address, then click "Broadcast Transaction". Copy the transaction text from the file on your USB drive, and click "Broadcast". Et voilà!
Disclaimer: Use this guide at your own risk. The author of this guide is in no way responsible for any loss, even when following the guide to the last comma. You're responsible for your own money. Don't do anything with it that you don't feel 100% comfortable with, and only test things out using small amounts.
thank you for sharing this tutorial. now i know on what can I do for my Storage System , this tutorial helps me a lot. thank you for posting. keep on sharing! your blogs are very nice and helpful.
ReplyDelete